Upgrading your bathroom with a bidet shower is one of the simplest ways to enhance personal hygiene and home comfort. Even with minimal plumbing experience, you can install a handheld bidet sprayer using basic tools and a few straightforward steps.
This guide covers the steps you need. With clear instructions, you will have your bidet shower working in no time.
What is a Bidet Shower?
A bidet shower is a small handheld spray nozzle that is used to clean yourself after using the toilet. You may also hear it called a “handheld bidet,” “bidet spray,” or “Muslim shower.” It connects to your bathroom’s water supply line, usually near your toilet tank.
Unlike a traditional bidet or bidet toilet seat, a bidet shower is simply a sprayer that you hold in your hand. When you press the nozzle, water sprays out to help you clean yourself with water instead of toilet paper.
Where It Is Installed:
- Attaches to the side of the toilet or nearby wall
- Connects to the same water supply line as your toilet
- The sprayer usually rests on a small hook or holder
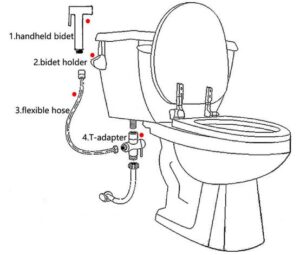
Main Parts of a Bidet Shower:
- Spray nozzle
- Hose
- Holder or bracket
- T-valve (splits water supply)
Bidet showers are a hygienic alternative to toilet paper. They are popular in many parts of the world and are easy to add to most bathrooms without major plumbing work.
Preparation Before Installing
Before starting, organize your workspace to ensure a smooth, leak-free installation. Most DIY bidet kits are designed to be “plug-and-play,” but having these tools ready will save time.
Required Tools & Parts:
- Adjustable wrench or pliers.
- Plumber’s tape (Teflon tape) for waterproof seals.
- The bidet sprayer kit (nozzle, hose, T-valve, and washers).
Pre-Installation Steps:
- Shut Off the Water: Turn the water supply valve (located behind the toilet) clockwise until it stops.
- Drain the Tank: Flush the toilet and hold the handle down until the tank is completely empty.
- Disconnect the Line: Unscrew the flexible water supply hose from the base of the toilet tank. Keep a small towel or bucket nearby to catch any residual water.
Below is a quick checklist:
| Preparation Steps | Have You Done This? |
| Gathered tools and parts | ☐ |
| Turned off shut-off valve | ☐ |
| Flushed toilet and emptied tank | ☐ |
| Removed toilet seat (if needed) | ☐ |
| Disconnected water supply line | ☐ |
| Laid out all parts and tools | ☐ |
Checking off each task helps you stay organized and prepared for installation.
Step-by-Step Installation of a Bidet Shower
Installing a bidet shower transforms your toilet into a more hygienic and convenient bathroom fixture. You only need basic plumbing tools, careful attention, and a few minutes to get everything working correctly.
Step 1. Attaching the T-Valve and Water Supply Connections
Begin by turning off the toilet’s water supply valve and flushing to empty the tank as previously mentioned.
Next, attach the T-valve. This small, T-shaped component lets water flow both to your toilet and your new bidet sprayer. Screw the T-valve onto the base of the toilet’s fill valve. Make sure the threads are aligned; do not overtighten.
Connect the toilet’s water supply hose to the bottom of the T-valve. Then, attach your new bidet hose to the side outlet of the T-valve. Make sure all connections are tight to prevent leaks, but avoid using excessive force that might damage the fittings.
Tip: Wrap plumber’s tape around threaded connections for a better seal.
Step 2. Installing the Bidet Sprayer and Hose
Uncoil the bidet hose that came with your kit. One end must already be connected to the T-valve from the previous step.
Take the other end of the hose and hand-tighten it to the sprayer handle. Make sure the rubber washer is inside the hose connector before you do this step. This helps avoid water leaks.
Check that the handle and hose are securely fastened. Test the handle trigger or button to be sure it operates smoothly. Most sprayers work with a simple squeeze, but some models may have extra features or water flow settings.
If your bidet kit includes extra washers or seals, check the instructions to see if you should add them for your plumbing setup.
Step 3. Mounting the Bidet Shower

You need a convenient place to store the sprayer. You have two primary options:
- Tank Mount: Slide the mounting bracket over the edge of the toilet tank and replace the tank lid.
- Wall Mount: Use the provided screws and wall anchors to secure the bracket to the wall at a comfortable reaching height.
Step 4. Testing for Leaks and Proper Operation
Open the main water supply valve by turning it counterclockwise. Listen for any hissing sounds from the connections; this can mean there is a leak. Look around every connection point: the T-valve, the hose, and the sprayer.
If you see any drips, turn off the water and tighten the connections or add plumber’s tape as needed.
Test the bidet sprayer by gently squeezing the handle while aiming at the bowl. Start on the lowest water pressure setting. Confirm that water flows smoothly and shuts off completely when you release the handle.
Wipe all connection points with a dry cloth, then check for any new moisture that would show a small leak. Adjust the water flow setting for your comfort.
Be sure that the sprayer holder keeps the nozzle securely in place and that the hose does not restrict the toilet seat or get in the way during normal use.
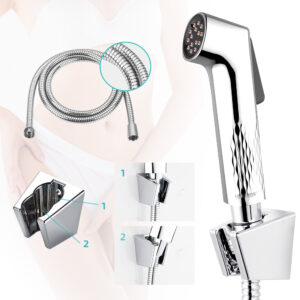
Recommended Bidet Shower: Leelongs Complete Bidet Shower Set
If you are looking for a reliable and versatile bidet shower, the Leelongs Complete Bidet Shower Set SH-5203 is an excellent choice. This handheld bidet sprayer is designed for easy installation and comes with several features that make it a great addition to any bathroom.
 |
 |
 |
|
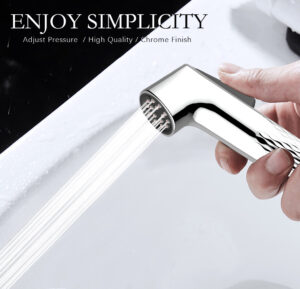
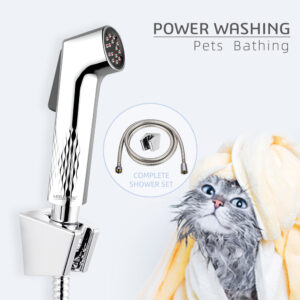
Key features of the Leelongs Bidet Shower Set include:
- Power Washing: Provides a strong, effective stream for cleaning.
- Adjustable Pressure: Allows you to control the water flow for comfort.
- High-Quality Chrome Finish: Offers a sleek, modern look that is also durable.
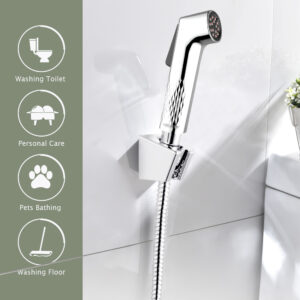
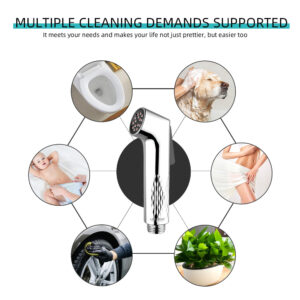
- Multi-Purpose Use: Can be used for personal hygiene, washing the toilet, bathing pets, and cleaning the floor.
This complete set has everything you need to upgrade your bathroom with a hygienic and convenient bidet shower.
Frequently Asked Questions
Can you install a bidet yourself?
Yes, you can typically install bidet attachments, seats, and handheld sprayers yourself with basic tools.
Do I need a plumber to install a bidet?
For bidet attachments, seats, and sprayers, you do not need a plumber. For a separate, standalone bidet fixture, a plumber is recommended.
What is the downside of a bidet toilet?
Potential downsides include the initial cost, the need for a nearby electrical outlet for some features, potentially cold water on basic models, and more complex maintenance than a standard toilet.
Do you need extra plumbing for a bidet?
You do not need extra plumbing for bidet attachments, seats, or sprayers. A standalone bidet fixture requires its own plumbing.


